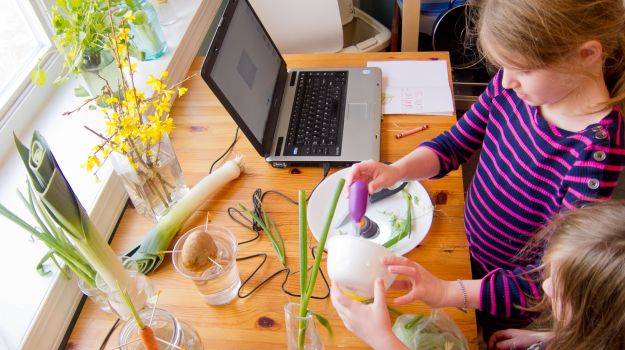
The culinary science lab takes over our kitchen table. Credit: Copyright 2016 Susan LutzMy adventures in the world of micro-gardening started innocently enough when I picked up a stray forsythia branch from our neighbor's yard waste bin while walking my daughters home from school on a cold winter afternoon. I shocked my girls, ages 7 and 4, when I told them that I could magically transform this dead branch into a flower bouquet within a week. My daughters thought I was crazy, which only encouraged me. It was time for some kitchen science.
We set about our kitchen garden experiments with a sound hypothesis: Mom cannot turn a dead stick and vegetables from the fridge into a living garden. I placed the forsythia in a vase, then busied my daughters with the task of stabbing toothpicks into various vegetables and placing them in water-filled mason jars. Over the next few days we waited and watched. By the week's end we not only had a beautiful vase of blooming forsythia, we also had a windowsill full of edible plants rooting in water and a science lab taking up most of the kitchen table.
Once I'd disproven the Mom-is-insane hypothesis, we moved forward with more gardening, more science and more curiosity. It felt important to show my daughters that the food they took for granted was grown somewhere and could grow again. Hence, the micro-garden experiment.
My eldest daughter believed that good science always requires goggles, so she started wearing eye protection for each experiment. Santa had been generous this year and we used our new digital microscope (which we hear cost the jolly old guy about $70) to examine our kitchen window garden from root to blossom.
We talked about how plants that bloom in the spring, such as forsythia and apple trees, develop flower buds at the end of their fall growing season and keep them throughout the winter, assuming they're not killed off by freezing temperatures or a heavy coating of ice that snaps off the buds. I was able to "magically" grow forsythia flowers from what seemed to be a dead twig because the tiny buds had been there all along. We examined the few remaining buds under the microscope and discussed the fact that even the smallest parts of plants can do important jobs.
The scientific method of micro-gardening
Next we moved on to vegetables. I pulled an old potato out of a dark kitchen bin and we talked about potatoes growing from "eyes." Looking at potatoes under the microscope was especially fun because the sprouting roots looked "pretty gross," according to my eldest daughter.
While cutting a green onion with scissors, my youngest daughter asked, "Is this actually real science?" My eldest quickly replied, "Of course it is!" Still suspicious, the younger one warned us, "Well, try not to explode anything." Her sister's reply was to the point, "Why not? Scientists take chances to see what they can do." I couldn't argue the point, nor did I want to. My daughters were hooked and we spent the next hour happily chopping, pouring and examining various plant parts.
Here are a few tips that may come in handy for your own micro-garden experiments. As a parent, you may also need to add a sense of humor and a large supply of patience.
General notes about sprouting plants from kitchen scraps
Use organic vegetables (chemicals used to prolong vegetable shelf life may prevent rooting)
Be sure to wash vegetables, supplies and countertops to help eliminate the possibility of food-borne illness such as salmonella and E. coli.
Change the water frequently (every day or two or as soon as it starts to get cloudy)
Keep your sprouting plants in a sunny window, preferably in a location you see at least once a day as part of your usual routine.
Only submerge the bottom part of the vegetable in water.
You may want to start several specimens of each plant variety because rooting can be a tricky business.
Discard vegetables that start to rot.
Useful science supplies and materials
Vegetables of all sorts
Mason jars, vases, glasses, cups and shallow bowls in assorted sizes (clear is best for maximum viewing)
Notebook and pencil or crayons (for recording hypotheses and results)
Funnels (nothing keeps kids engaged better than a little water play)
Kitchen towels (for inevitable water spills)
Tweezers
Magnifying glass
Microscope
Goggles (for the cool scientist look)
Toothpicks (for anchoring root vegetables at top of water-filled container)
Knives (to be wielded only by adults and trustworthy kids of a certain age)
Scissors (mostly for the kids' entertainment). Grownups want to use a sharp knife to achieve a clean cut for actual rooting purposes.
Good vegetable candidates for rooting in water
Green onions and leeks (will re-grow from roots, even if you've eaten the green part off the top)
Potatoes and sweet potatoes (make sure they have plenty of "eyes" in the portion you submerge in water)
Lettuce and celery (will grow from the discarded root-end of the plant)
Basil (will grow from leaf cuttings)
Garlic
Lemongrass
Carrot tops (will grow greens from the top half-inch of the carrot, called the "shoulder," as well as the remaining brown stem, even if you've eaten most of the orange root)
We've found ourselves coming back to our kitchen science station every few days over the past couple of weeks. We've even expanded the range of our experiments to include growing lettuce, thyme and chives from seed in recycled plastic containers, the kind that usually contain berries or sprouts.
Some of our experiments have been a success and some haven't, but they've all been productive in their own way. We've learned a lot about the life cycle of edible plants. And we have a new family song, sung to the tune of "Head, Shoulders, Knees and Toes" that begins, "Goggles are the latest clothes, latest clothes." But my real triumph was when my daughter wanted to temporarily suspend the experiments by sweetly asking, "Mom, can I please eat this carrot?"
Copyright Susan Lutz via Zester Daily and Reuters Media Express


