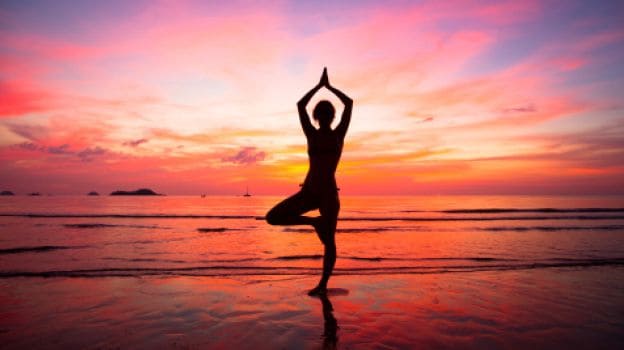
Without the sun, there will be no life on earth. Surya Namaskar or 'Sun Salutation' is a very ancient technique of paying respect or expressing gratitude to the sun that is the source of all forms of life on the planet. Symbolically, the sun becomes our source of energy as well. About the history of this technique, it has been said by the ancient rishis of India that the different parts of the body are governed by different devas (divine impulses or divine light). The solar plexus (located behind the navel, which is the central point of the human body), also known as the second brain, is said to be connected to the sun. This is the main reason why the ancient rishis recommended the practice of Surya Namaskar, because the regular practice of this technique enhances the solar plexus, which increases one's creativity and intuitive abilities.(Yoga for Weight Loss: 6 Ways to Get Back in Shape)
 Step 1 (Prayer Pose)
Stand at the edge of your mat, keep your feet together and balance your weight equally on both the feet. Expand your chest and relax your shoulders. As you breathe in, lift both arms up from the sides and as you exhale, bring your palms together in front of the chest in prayer position.
(Stress Buster: Yoga is What You Need for a Healthy Mind)Step 2 (Raised Arms pose)
Breathing in, lift the arms up and back, keeping the biceps close to the ears. In this pose, the objective is to stretch the whole body up from the heels to the tips of the fingers. To get maximum benefits, you may pull the pelvis forward and ensure reaching up with your fingers rather than going backwards.Step 3 (Hand to Foot pose)
Breathing out, bend forward from the waist, keeping the spine erect. As you exhale completely, bring the hands down to the floor, beside the feet.(Prime Minister Narendra Modi to Perform Yoga at a Public Event)Step 4 (Equestrian pose) Breathing in, push your right leg back, as far back as possible. Bring the right knee to the floor and look up.(Yoga for Runners: What are the Best Stretches?)Step 5 (Stick pose)
As you breathe in, take the left leg back and bring the whole body in a straight line and keep your arms perpendicular to the floor.Step 6 (Saluting with eight points or parts)(Yoga Boosts Brain Power in Older Adults)
Gently bring your knees down to the floor and exhale. Take the hips back slightly, slide forward, rest your chest and chin on the floor. Raise your posterior a little bit .The two hands, two feet, two knees, chest and chin (eight parts of the body) should touch the floor.Step 7 (Cobra pose) Slide forward and raise the chest up into the cobra posture. You may keep your elbows bent in this pose, the shoulders away from the ears. Look up. As you inhale, make a gentle effort to push the chest forward; as you exhale, make a gentle effort to push the navel down. Tuck the toes under. Ensure you're stretching just as much as you can; do not force.(Five Easy Yoga Poses For Common Health Problems)Step 8 (Mountain pose)
Breathing out, lift the hips and the tail bone up, chest downwards in an 'inverted V' (/\) posture. If possible, try and keep the heels on the ground and make a gentle effort to lift the tailbone up, going deeper into the stretch.Step 9 (Equestrian pose)
Breathing in, bring the right foot forward in between the two hands, left knee down to the floor, press the hips down and look up and place the right foot exactly between the two hands and the right calf perpendicular to the floor.In this position, make a gentle effort to push the hips down towards the floor, to deepen the stretch.
Step 10 (Hand to foot pose)
Breathing out, bring the left foot forward. Keep the palms on the floor. You may bend the knees, if necessary. Gently straighten the knees and if you can, try and touch your nose to the knees. Keep breathing.Step 11 (Raised Arms pose)
Breathing in, roll the spine up, hands go up and bend backwards a little bit, pushing the hips slightly outward. Ensure that your biceps are beside your ears. The idea is to stretch up more rather than stretching backwards.Step 12
As you exhale, first straighten the body, and then bring the arms down. Relax in this position; observe the sensations in your body.
1. Improves Blood Circulation of the Body
Due to the active process of inhalation and exhalation, the lungs are constantly ventilated and the blood remains oxygenated. It's a great way of detoxing your body and helping it get rid of excess carbon dioxide and other toxic gases.2. Your Mantra to Weight loss
When done at a fast pace, it is a great cardiovascular workout that stretches the abdominal muscles while simultaneously helping you reduce excess weight around your stomach. The asanas also result in toning your arms, abs and giving great flexibility to your spine. Moreover, It helps to strengthen your entire skeletal system including your ligaments.3. Promotes a Regular Menstrual Cycle
If you're facing the problem of an irregular menstrual cycle, these asanas will help you suppress this irregularity and if practiced daily, it ensures an easy childbirth.4. Benefits your Skin and Hair
By incorporating it in your routine it will keep you youthful and healthy even in old age. It improves your blood circulation that aids in bringing back the glow on your face; preventing the onset of wrinkles, making your skin look ageless and radiant. It also prevents hair loss and the ageing of hair.(Yoga May Help Overcome Anxiety Disorders)5. Anti-anxiety and Calming Properties
Surya Namaskar helps to improve memory and the nervous system. Moreover, its stabilizes the activity of the endocrine and thyroid glands, thereby reducing anxiety and inducing the sensation of complete calmness and tranquility.
How To Do Surya Namaskar: The 12 Poses
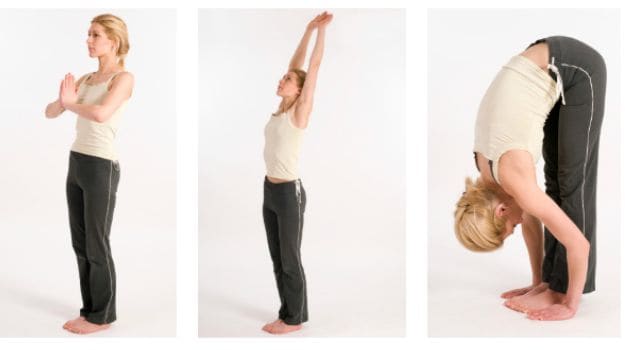 Step 1 (Prayer Pose)
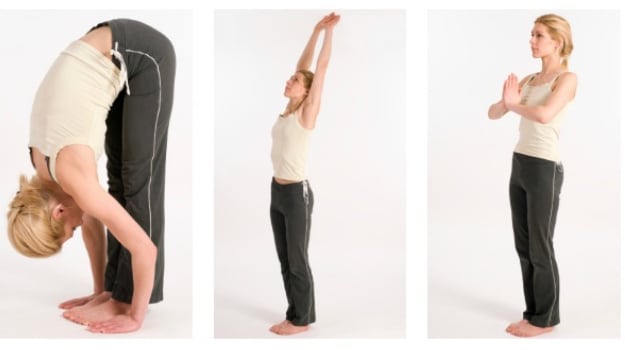
Stand at the edge of your mat, keep your feet together and balance your weight equally on both the feet. Expand your chest and relax your shoulders. As you breathe in, lift both arms up from the sides and as you exhale, bring your palms together in front of the chest in prayer position.
(Stress Buster: Yoga is What You Need for a Healthy Mind)Step 2 (Raised Arms pose)
Breathing in, lift the arms up and back, keeping the biceps close to the ears. In this pose, the objective is to stretch the whole body up from the heels to the tips of the fingers. To get maximum benefits, you may pull the pelvis forward and ensure reaching up with your fingers rather than going backwards.Step 3 (Hand to Foot pose)
Breathing out, bend forward from the waist, keeping the spine erect. As you exhale completely, bring the hands down to the floor, beside the feet.(Prime Minister Narendra Modi to Perform Yoga at a Public Event)Step 4 (Equestrian pose)
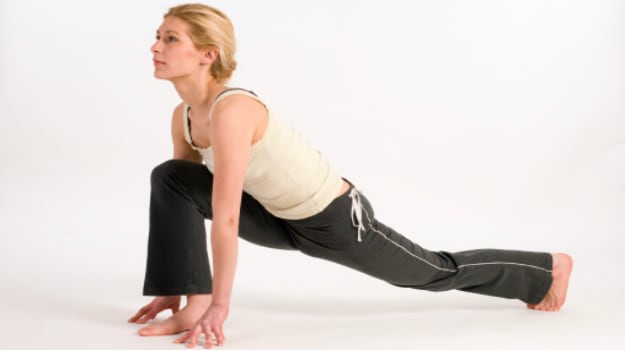 Breathing in, push your right leg back, as far back as possible. Bring the right knee to the floor and look up.(Yoga for Runners: What are the Best Stretches?)Step 5 (Stick pose)
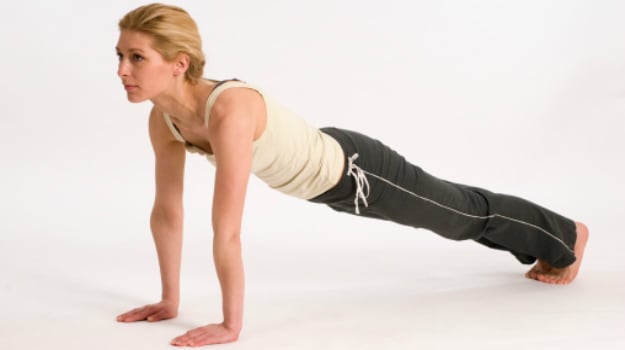
As you breathe in, take the left leg back and bring the whole body in a straight line and keep your arms perpendicular to the floor.Step 6 (Saluting with eight points or parts)(Yoga Boosts Brain Power in Older Adults)
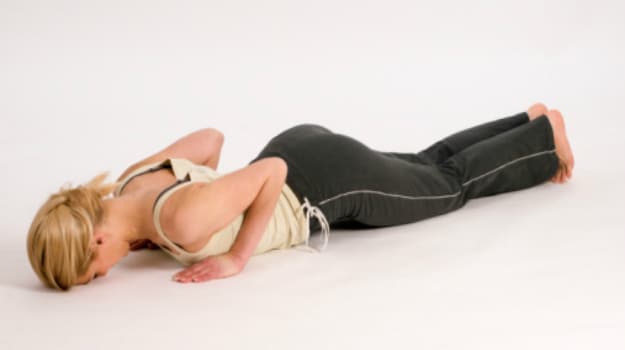
Gently bring your knees down to the floor and exhale. Take the hips back slightly, slide forward, rest your chest and chin on the floor. Raise your posterior a little bit .The two hands, two feet, two knees, chest and chin (eight parts of the body) should touch the floor.Step 7 (Cobra pose)
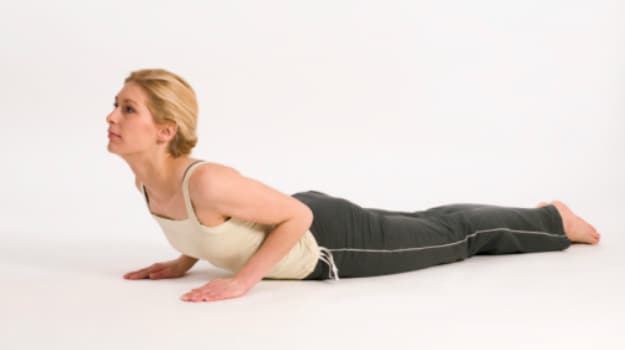 Slide forward and raise the chest up into the cobra posture. You may keep your elbows bent in this pose, the shoulders away from the ears. Look up. As you inhale, make a gentle effort to push the chest forward; as you exhale, make a gentle effort to push the navel down. Tuck the toes under. Ensure you're stretching just as much as you can; do not force.(Five Easy Yoga Poses For Common Health Problems)Step 8 (Mountain pose)
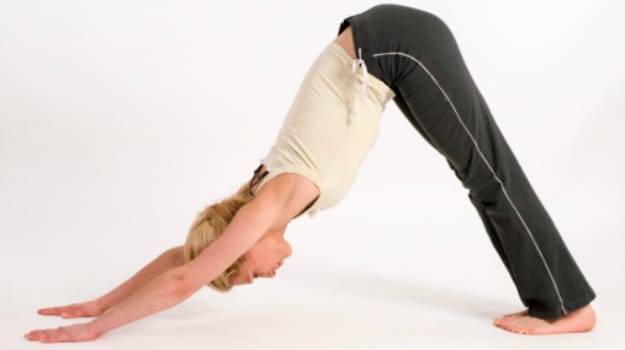
Breathing out, lift the hips and the tail bone up, chest downwards in an 'inverted V' (/\) posture. If possible, try and keep the heels on the ground and make a gentle effort to lift the tailbone up, going deeper into the stretch.Step 9 (Equestrian pose)

Breathing in, bring the right foot forward in between the two hands, left knee down to the floor, press the hips down and look up and place the right foot exactly between the two hands and the right calf perpendicular to the floor.In this position, make a gentle effort to push the hips down towards the floor, to deepen the stretch.
Step 10 (Hand to foot pose)
Breathing out, bring the left foot forward. Keep the palms on the floor. You may bend the knees, if necessary. Gently straighten the knees and if you can, try and touch your nose to the knees. Keep breathing.Step 11 (Raised Arms pose)
Breathing in, roll the spine up, hands go up and bend backwards a little bit, pushing the hips slightly outward. Ensure that your biceps are beside your ears. The idea is to stretch up more rather than stretching backwards.Step 12
As you exhale, first straighten the body, and then bring the arms down. Relax in this position; observe the sensations in your body.
Top 5 Benefits of Surya Namaskar
1. Improves Blood Circulation of the Body
Due to the active process of inhalation and exhalation, the lungs are constantly ventilated and the blood remains oxygenated. It's a great way of detoxing your body and helping it get rid of excess carbon dioxide and other toxic gases.2. Your Mantra to Weight loss
When done at a fast pace, it is a great cardiovascular workout that stretches the abdominal muscles while simultaneously helping you reduce excess weight around your stomach. The asanas also result in toning your arms, abs and giving great flexibility to your spine. Moreover, It helps to strengthen your entire skeletal system including your ligaments.3. Promotes a Regular Menstrual Cycle
If you're facing the problem of an irregular menstrual cycle, these asanas will help you suppress this irregularity and if practiced daily, it ensures an easy childbirth.4. Benefits your Skin and Hair
By incorporating it in your routine it will keep you youthful and healthy even in old age. It improves your blood circulation that aids in bringing back the glow on your face; preventing the onset of wrinkles, making your skin look ageless and radiant. It also prevents hair loss and the ageing of hair.(Yoga May Help Overcome Anxiety Disorders)5. Anti-anxiety and Calming Properties
Surya Namaskar helps to improve memory and the nervous system. Moreover, its stabilizes the activity of the endocrine and thyroid glands, thereby reducing anxiety and inducing the sensation of complete calmness and tranquility.
Advertisement

